decorating my apartment with parabo press

I’ve lived in Salt Lake City for almost three months now, which is crazy to say! I’ll admit that it still doesn’t truly feel like home, but I’ve finally gotten around to decorating the majority of my apartment to pull the whole thing together.

I’m excited to be working with Parabo Press on this post! I’ve worked with Parabo Press before, in college, so it’s fitting that I’m working with them again. As a photographer, print quality is very important to me. After my trip to Europe this summer, I knew I wanted to print a lot of my favorite photos to hang in my apartment.

My decorating style is very precise – but it changed a lot through my shopping process. You can see my original style and how it changed just by looking at my Pinterest board. I would still love to make my bedroom more of the bright, bohemian style as it’s somewhat plain right now, but I think I need more artwork for that.

Parabo makes some of the highest quality prints that I’ve seen. I’m a fan of the matte look, and they do it best! Not only is the quality phenomenal, but the colors are very true to the photos you submit online. I use Lightroom to edit my photos and edited my photo of Cinque Terre (the big one in the middle) specifically to match my apartment, bringing out the blues in the ocean and the pinks and oranges in the houses.

The large print in the middle is a Square Engineer Print (only $25) and it’s three feet by three feet. This would be a perfect piece for a family photo, a photo from a vacation or even a photo of a pet! Even though my print was very large, the photo quality is still gorgeous and isn’t pixelated.

The smaller prints are 5×7 Classic Prints that come in a set of 20 photos for $15. They also have 4×6 options, as well as larger sizes in their Fine Art Prints. I chose a photo from each city I visited, with similar bright colors as my center photo.

Here’s a link to the frames surrounding the large print and the wooden rail hanging for the large print.

Below are several links to similar couches. I got mine from Ashley Furniture and I would recommend checking out a showroom or something similar instead of just buying online, because there was such a wide range of comfort levels. Originally I was interested in a cream-colored couch but I’m glad I moved away from that idea! This couch is the perfect neutral color and it’s also big enough for multiple people. (I couldn’t resist adding the gorgeous blue couch!)

Here’s a link to my throw from Amazon for only $20! Mine is in the color orange but I would say it’s more of a salmon. My current pillows are from Walmart but I think I need more.

The family photo on my TV stand is another piece from Parabo! I decorated this space with a ladder shelf from Target (an impulse buy that was discounted back in August). This is the exact one, but here are a few similar options. I considered hanging something above the TV, but I’m glad I strayed away from that. I think it would have made the space too busy.

My plants are an aloe plant and a climbing peperomia. I got the aloe plant from Walmart’s nursery and the peperomia at a thrift sale, surprisingly. They’re both very easy to care for. This is a link for my bookends. My KU print on the bottom shelf is linked here!

Here’s a link to my barstools from Target. Originally I had neutral metal ones but I’m so happy I returned them for these! They’re comfortable and sturdy and add the perfect pop of color in my kitchen/living room area.

My rug, my chair and my TV stand are all from Utah Furniture Deals. If you’re in Utah (or even close enough in Colorado/Idaho/Wyoming), I cannot recommend her enough! She buys wholesale furniture and sells them at a lower price. She has the best collection of styles and helped me find the pieces I wanted. I will admit that I really wanted a hot pink accent chair, but I’m glad I chose the navy instead. It balances out the room and I think the pink would be too overwhelming.

I know everyone that reads my blog isn’t local (and the majority of my readers are still in Kansas City), so here are some links to chair and rug options that are similar.

I also ordered a Newsprint (only $25) of one of my favorite photos I took at KU, overlooking the football stadium and campus with all the leaves changing in fall. I spent the majority of my time in college with the football program and I’m happy I have this photo to commemorate that. The Newsprints come folded into fourths and have a very similar feel to a newspaper with bright, true colors.

I hung my newsprint using Good Hangups. It’s a set of magnetic stickers that come with strong magnets, so you can easily stick the magnet on the wall and hang your photo without damaging the print or the wall. Genius.

The photos hanging above are a mix of old Parabo Press Square Prints from my last collaboration and the Classic Prints. They are photos of my friends and family and the perfect reminder of home.

Thanks for reading!
xo, Hannah

Continue Reading

Five Common Photography Mistakes and How to Fix Them

5 Ways You're Taking Photos Wrong | Hannah With a Camera

I’ve been actively shooting photos for about six years, since eighth grade. However, I’ve had an interest in photography for way longer! If you go through my desk drawers and old scrapbooks, you can find photos from a disposable camera from Girl Scout camp, church camp, and family vacations. (I recently found a hilarious posed shoot with my American Girl dolls…) Over the years, I’ve learned a lot of tricks about photography and composition. You can read more of my posts about photography here! One of the best things about taking photos for so long means that I’ve made several mistakes and learned from them! Here are the top five mistakes that I’ve made and have learned from.

5 Ways You're Taking Photos Wrong | Hannah With a Camera

1. You’re still shooting in auto.

Five Ways You're Taking Pictures Wrong | Hannah With a Camera

I see so many people that buy a DSLR (a camera that can change lenses, not just a point-and-shoot) in an attempt to learn photography, but they only keep it on auto mode. This is probably the biggest mistake you can make if you’re trying to learn! If you’re not willing to make the full leap and commit to manual mode, you have two options: Av or Tv mode.

Av/A mode, or aperture priority, will help you learn how to control the depth of field. This is the trick to give you that ‘professional’ blurry background that everyone wants. Tv/S mode, or shutter priority, will help you learn how to control the movement in your photos. For example, if you’re taking photos of athletes, this will let you keep them in focus instead of making them blurry once they move out of the screen. After you conquer those two methods, you can advance to mastering manual mode!

Solution: Shoot in Av, Tv, or manual mode.

2. You don’t take advantage of your focal points.

Five Ways You're Taking Pictures Wrong | Hannah With a Camera

If you think you’ve figured out manual mode or Av mode, then you’ve probably figured out how to blur the background and get that desired bokeh. However, your photos are always out of focus–and you can’t figure out why. To pinpoint focus every time, you need to select a focal point on your DSLR. For Canons, you can do this by pressing the +/zoom in button, and a screen that says ‘AF point selection’ will pop up. Then you can use the dial to change where you want your camera to automatically focus. For portraits, you’ll want to always focus on the eye nearest to you. When you look through the viewfinder of your camera and hold the shutter halfway down, you can see the red dot of the focal point you selected and move your camera or focal point accordingly.

Solution: Select your focal point to nail focus every time.

3. You’re shooting straight into the sun.Five Ways You're Taking Pictures Wrong | Hannah With a Camera

I always see people getting excited about going out to do a photoshoot, then taking all their photos in the middle of the day when the sun is at its brightest, making all their photos either overexposed or extremely shadowy. An easy fix to this is to shoot at golden hour. This is a common term in photography that refers to the time of day when the sun is coming up or going down. However, I get that photoshoots are hard to coordinate–so if you’re taking pictures in the middle of the day, find the shade or cloud that doesn’t make your light so harsh.

Solution: Change the time of day

4. You’re always taking photos from eye-level.

Change up your perspective every once in a while! You can go for a bird’s eye view, shoot from the ground, and so much more. For the first photo below, I got down and laid on my stomach to get the right perspective and be on eye-level with my subject. For the second one, I stood above her and shot down. See the difference?

Five Ways You're Taking Pictures Wrong | Hannah With a Camera Five Ways You're Taking Pictures Wrong | Hannah With a Camera

Solution: Change your perspective and move around your subject.

5. You’re following all the rules.

I know, this contradicts probably everything you’ve ever read…but the best part about art is that it’s all about creating your own style. After you learn how to use the rule of thirds, then feel free to shoot symmetrically to create an interesting style. After you learn how to use light ‘correctly,’ then use the shadows from your window to experiment with how light plays across your subject. There are so many options out there, so one of the best ways to learn photography is to just get out there and practice!

Feel free to ask any questions in the comments, I love sharing my knowledge about photography!

xo, Hannah
Continue Reading

Inside The Insta with A Day In The Kitchen

Somehow I found Lauren’s instagram, A Day In The Kitchen, through someone else and I was immediately drawn in by her gorgeous photos. Then I did a little more research and found that she posted her own recipes..and that’s she’s only in middle school. How’s that for impressive?

A Day In The Kitchen-Inside The Insta

How did you get started with baking?

My mom (who passed away a year ago from cancer) is the one who made me start to enjoy food and love trying out new stuff and being in the kitchen, but I actually started wanting to have a bakery and have a blog/food account when I saw the show DC Cupcakes a few years ago!

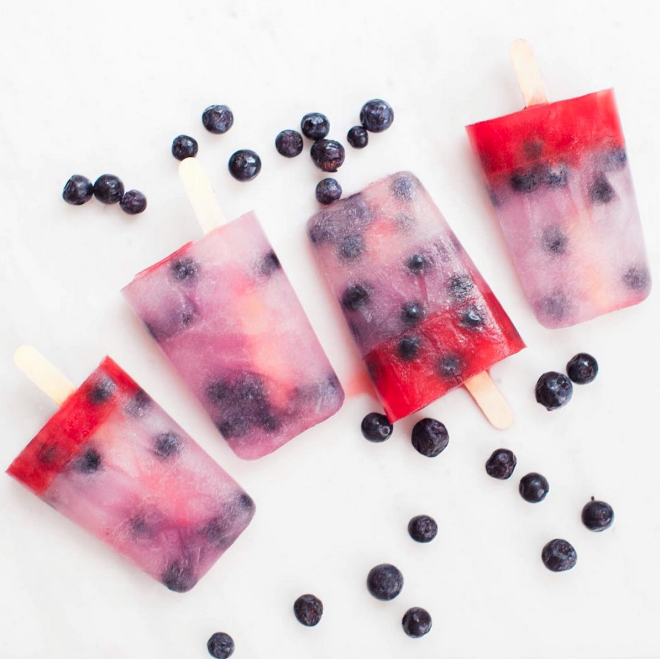
Berry Lemonade Ice Pops
What’s your favorite part of baking/cooking? 

I love being able to be in the kitchen and try out new recipes and try new foods! Making cupcakes are high on the top of my list for favorite things to make! 🙂

Can you share your favorite recipe?

These were a big hit and one of my favorite desserts!

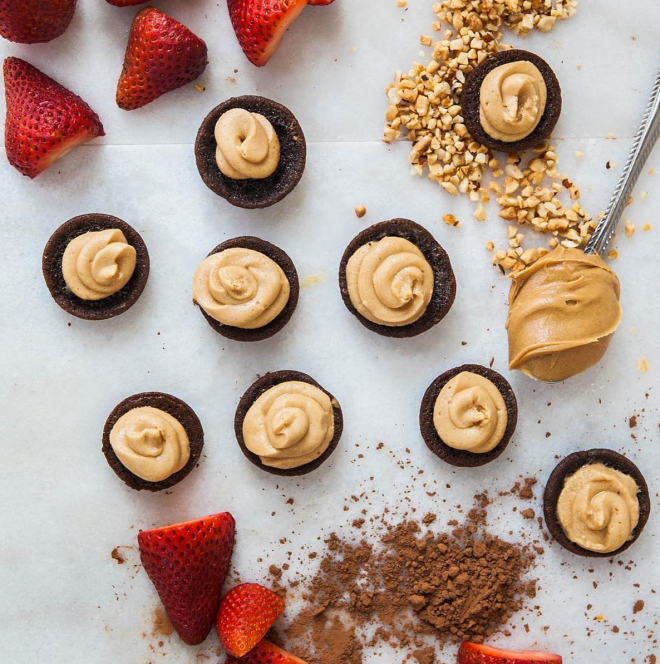
Mini GF Black Bean Chocolate Cupcakes with Peanut Butter Frosting

Do you take your own photos? If you do, how’d you learn photography?

Actually, my sister is a photographer and has taken some of the photos. She’s also taught me a little about how to take pictures so I have also taken some that are on my account!

Have you ever considered starting a blog?
I have! My sister has a blog and I have really wanted to start one! We have thought to do one in the future once I have a few more people following my account! I would love to start one! 🙂
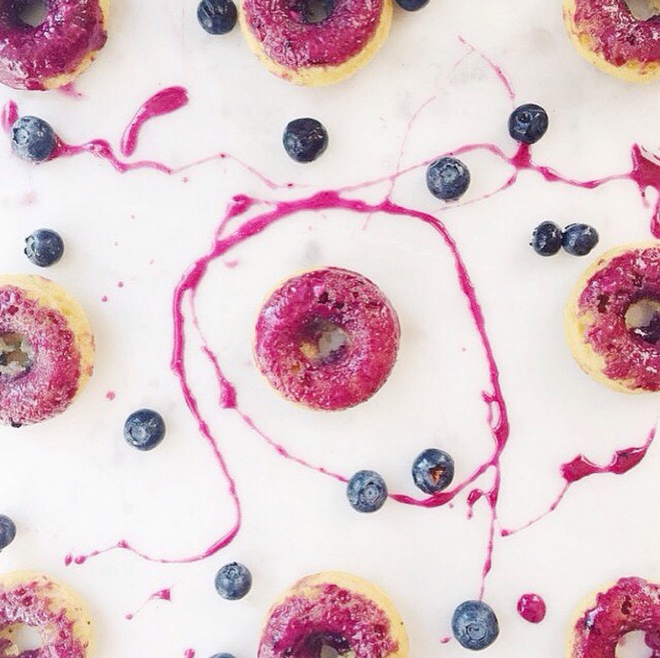
Mini Poppyseed Donuts With Blueberry Glaze
Lauren currently has 675 followers on her still-growing account, and I’d say that’s definitely enough to start her own blog by now. I can’t wait to see what she has in store for the future!
Thanks for reading,
fixed monogram
Continue Reading

Faceless Portrait

As a student in AP Art this year, I’m putting together a portfolio to be submitted. One of the categories required is a concentration. For my concentration, I chose the topic ‘faceless portrait’ based off the National Geographic Your Shot challenge. (Side note–if you’re a photographer interested in getting prompts to expand your horizons, Your Shot is an awesome place to check out.)

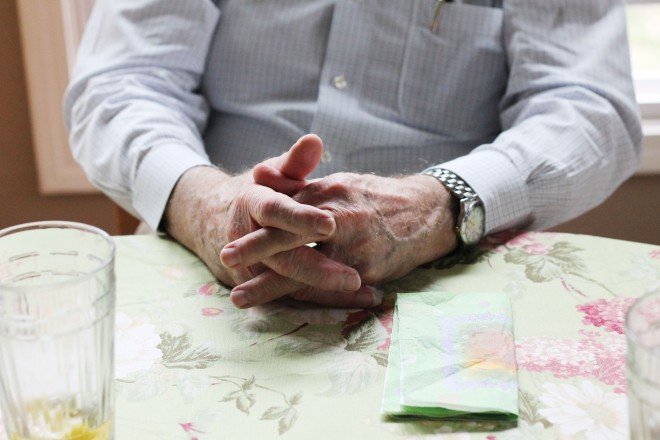
hands6

I had taken this photo last year of my cousins’ grandpa. To some this may just seem like a photograph of hands, but when I showed my family members, they immediately knew who it was without any analysis of details. The mannerism that he holds of dignity and relaxation is unique to him and I didn’t need his face to show that.

7

This photo is another one of my favorites, taken of my dad at the Nelson-Atkins Museum here in Kansas City. This is called Glass Labyrinth by Robert Morris. Watch the aerial video of the opening day, it’s super cool! The way the glass reflects and intersects often creates an interesting illusion and this created a sort of mirror effect–real on one side, ghostly on the other.

IMG_5560

This photo was taken at a Sporting KC game of one of the fans in front of me. The way his hands are on his head and how his head is tilted back in frustration reminds me of something a coach or a father would do. While this position on an adult would be seen as typical, seeing on a child provides a humorous aspect.

This is possibly my favorite photo I’ve taken so far! I took it while serving food at a homeless shelter. What draws me to this photograph is how much you can tell about the people without seeing their expressions. You can tell that the man loves the little girl and that he’ll protect her. You don’t need a face to explain love.

original1

These photos are all unedited and I plan to share more in the future. Photography is one of my greatest passions and I love expressing myself through it. That being said, I recently did an interview with one of my favorite photographers and I’ll share that on the blog soon!

Thanks for reading,

fixed monogram

Continue Reading

Photography from A-Z

When I first started using my Mom’s DSLR as a freshman in high school, I was ridiculously overwhelmed. How was I supposed to know how to work anything? Now, as a senior, I’ve become much more acquainted with the manual setting on my camera and I can successfully navigate around the controls. I took several photography classes to learn, but the internet is a great place to start too! I’ve rounded up some of the best tutorials online to learn everything about stepping into manual.

the a-z's of photography

A- Aperture (a guide about f/stop)

B- Bokeh (how to get a soft background)

C- Canon (the seven best entry-level Canons)

D- Diffuser (a DIY flash diffuser)

E- Editing (editing for beginners)

F- F/Stop (free download of a chart explaining f-stop)

G- GIMP (free photo editing program similar to Photoshop)

H- Headshot (tips on taking the perfect headshot)

I- iPhone (10 iPhone tips and tricks)

J- Jargon (explaining the language of photography)

K- Kelvin (understanding how white balance and temperature works)

L- Lenses (upgrading after you’ve gotten used to your kit lens)

M- Metering (intro to metering and focus)

N- Noise (avoiding the grain in pictures)

O- Outdoor Lighting (tips on improvement)

P- Panning (how to pan in pictures)

Q- Quotes (50 quotes about photography)

R- Reflector (DIY reflector tutorial)

S- Shutter Speed (intro to shutter speed)

T- Tilt Shift (creating tilt-shift photos in post processing)

U- UV Filters (what to know about ultraviolet filters)

V- Vibrance (the difference between vibrance and saturation)

W- Website (the best websites to learn from)

X- eXposure (how to nail exposure)

Y- You (photography projects that you can do)

Z- Zoom (a guide to what the mm means on your lens)

Thanks for reading!

navy monogram

Continue Reading

Adobe Camera Raw Editing Tutorial

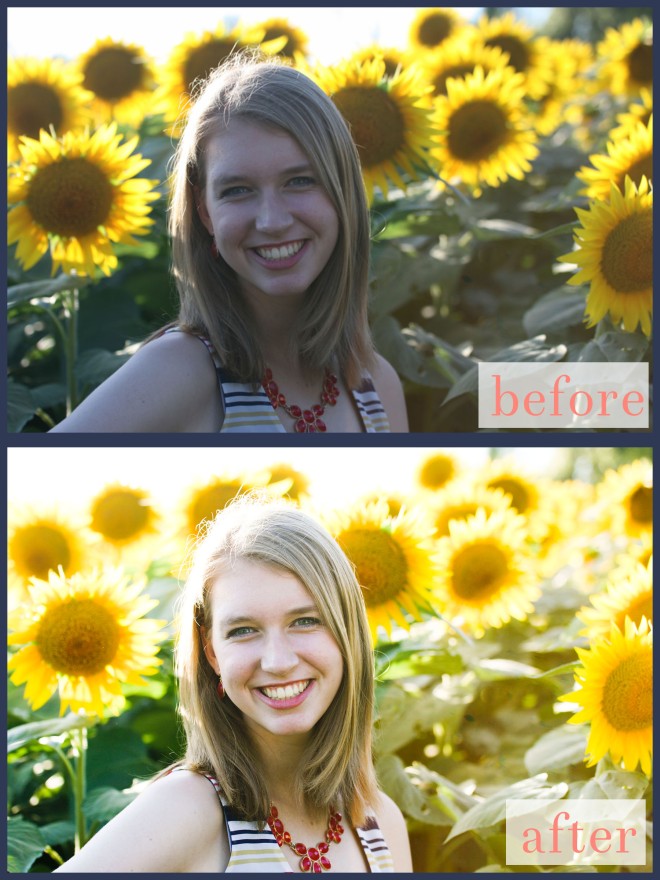
edit, don't fret it: before and after details of editing photos!

As a senior, I’ve been having my mom take photos of me at every opportunity. Instead of shelling out hundreds of dollars for one senior photoshoot that’ll represent me in only one season, we’ve been taking several afternoons to take pictures in different locations, with other people, new props, etc. While I can’t take the photos myself (thanks, Mom!), I’m the one who edits them.

edit, don't fret it: before and after details of editing photos!

We went to Grinter Farms in Lawrence, KS (my future college town!) this summer to take photos with the gorgeous sunflower field and I’m just now getting around to edit these. This field is incredible and I definitely recommend stopping by if you’re in Kansas in summer!

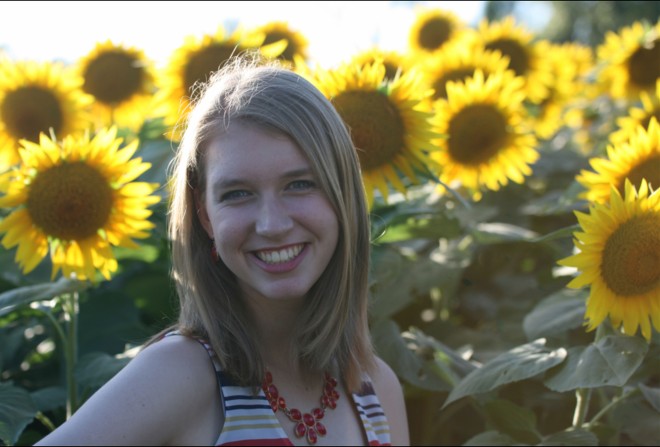
Original Photo

I’m starting with this photograph. The highlights are kind of blown out by the backlighting of the sun and the photo is cooler-toned overall. Not super summery.

1

I took this photo into Camera Raw in Adobe Bridge–always my first step–and turned up the exposure. While a full stop (+1.15) might seem like a lot, it was definitely necessary. The original photo washed out the details and value, so I then turned up the contrast. There’s a huge difference with the clarity of my eyes in the original photo and the edited photo. To make the photo less blue-hued, I turned the temperature up to give it a warmer, summery feel. I didn’t want to mess with the tint with fear of making my skin look too green or purple-ish.

No matter what photo I edit, portrait or landscape or still life, I always bump up the highlights and take down the shadows. I do the same thing with the whites and the blacks. This always gives me great contrast without looking too grainy. I was going to mess with the clarity, but it made my skin tone look weird. I only turned the vibrance and saturation up a tiny bit with fear of making the sunflowers look too fake and like a middle schooler edited it with a rainbow filter.

4

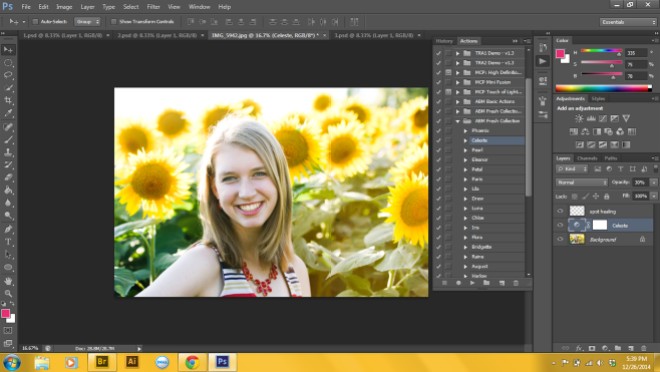
After making my primary edits in Camera Raw, I opened up the photograph in Photoshop. I used the Spot Healing tool on a few blemishes I wanted to remove on a new layer. Then, I used A Beautiful Mess’s Fresh Action, Celeste, to bump up the contrast even more. It was too much at 100% though, so I turned it down to 30%.

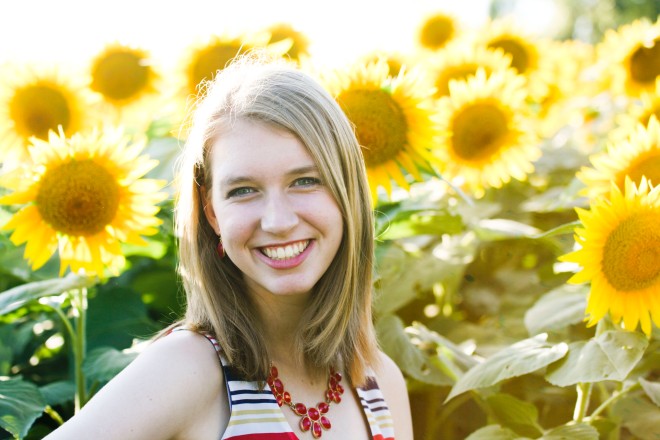
IMG_5942

Here’s my final photo! While it seems like this took a ton of time, it only took me about 3 minutes tops. If you have any questions just comment, I’d love to help!

navy monogram

Continue Reading

The Essentials in My Camera Bag

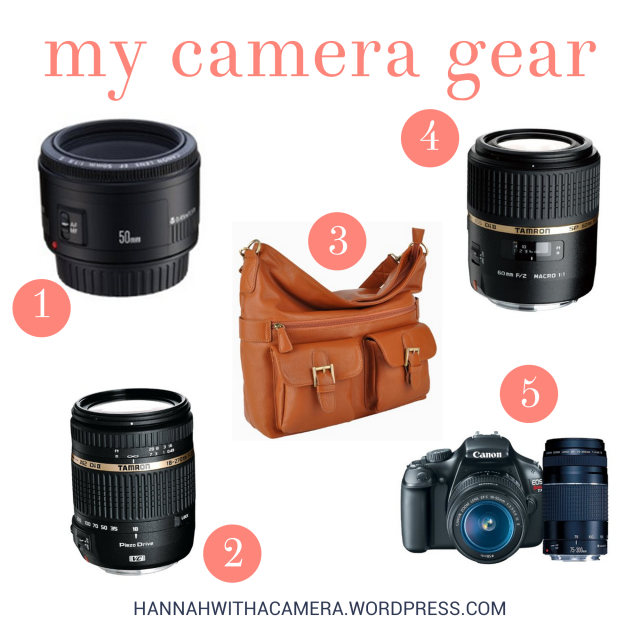
my camera gear

1) Canon EF 50mm f/1.8 II Camera Lens
This lens is the first upgrade I made in my own collection after my kit lenses. I love the bokeh that it gives and I think prime lenses are great for the cheaper price if you’re taking portraits. This works fantastic in low light.

2) Tamron AF 18-270mm f/3.5-6.3

The Tamron lenses aren’t mine, because I don’t have money flowing out of my pockets. However, I get a ton of use out of them (thanks Mom for letting me borrow)! This lens has a great zoom and is super sharp. It’s a great everyday lens to use in all sorts of situations.

3) Gracie Butterscotch
I am in love with this camera bag. I took it with me this summer to San Francisco and it was a great alternative to my ugly black camera bag that came with my camera. The color is super versatile (but the mint color is adorable) and this bag holds a ton, not only in the removable compartments but also in the roomy top and multiple pockets.

4) Tamron AF 60mm f/2.0

This lens is the love of my life. I’ve used it for several senior portrait shoots and the quality is incredible. It works great in low light situations and the colors turn out very crisp.

5) Canon EOS Rebel T3 with 18-55mm Lens + Canon EF 75-300mm f/4-5.6 Lens
This camera is my baby. I love the ability to do both video and photo and it’s a great entry-level DSLR, especially for someone like me who’s still learning! I got my camera as a Black Friday deal two years ago, but these are the same kit lenses that came with it.

Continue Reading